Intel PRO/1000 Adapter Test Utilities
NOTE: If you are looking for information to test Intel
PRO/100 adapters, you may find it here.
Intel's diagnostic software lets you test the
adapter to see if there are any problems with the adapter hardware, the cabling,
or the network connection. You can also use diagnostics to isolate problems during
troubleshooting. There are two test programs documented here. The operation of
both are identical.
These utilities are designed to test hardware
operation and confirm the adapters ability to
communicate with another adapter in the same network, primarily confirming
cabling. It should not be used to judge performance.
They can test the adapter whether
or not there is a responder on the network while you run the tests. In order to
do a thorough test, you must set up a second system on the network as a
responder prior to starting a test.
-
Boot to DOS or the EFI shell.
-
Navigate to the \TOOLS
directory.
-
Under DOS, type DIAG1000, and press <Enter>.
Under EFI, type D1000_64, and press <Enter>.
The test utility program automatically
scans the hardware and lists all Intel gigabit adapters. They are listed in
this screen. (NOTE: If you have only one adapter in your system, this screen
will be bypassed).
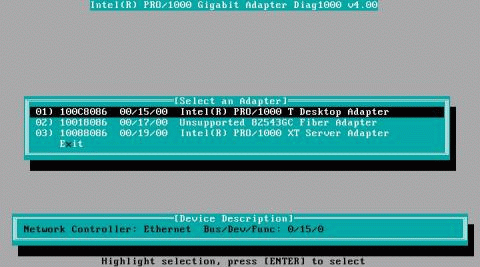
Select the
adapter you want to test by moving the highlight and pressing <Enter>.
-
The test utility program displays its
main menu:
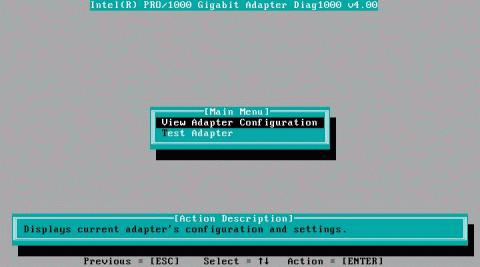
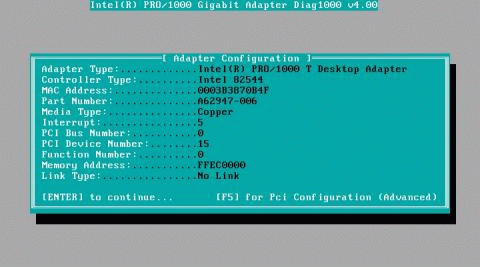
Selecting "View Adapter Configuration" will bring up
the adapter configuration screen. This screen describes various properties of
the adapter.
You can view additional information on the PCI slot occupied by
the adapter by pressing <F5>. This is primarily used for troubleshooting
by Intel technical support.
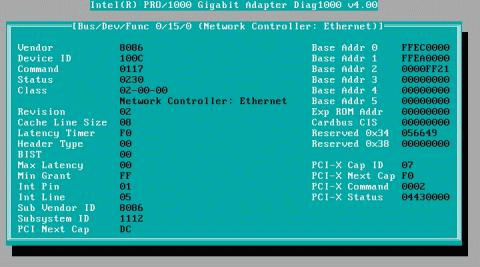
You can display information on all PCI slots by pressing
<Enter>. If the slot does not have an Intel gigabit adapter installed, the
Device Description field will show "Unknown Device".
Selecting "Test Adapter" from the Main Menu brings up
the Test Menu. This allows the user to test the adapter, select which tests to
perform, set the adapter up as a network responder, or perform a continuous
network sender test.
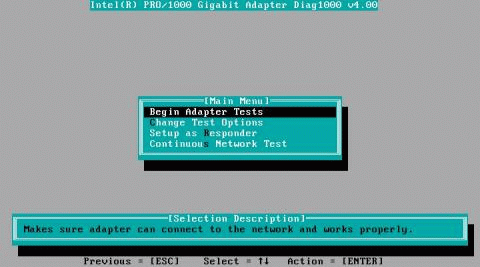
Begin Adapter Tests
Selecting this option brings up the test screen. While tests are
being performed, a rotating spinner is shown letting the user know that the
application is still "alive." The results of the tests are displayed as each
test is performed. If multiple test passes are selected, then the results
contain a count of test failures. A list containing zeros mean that all tests have
passed.
If there is no responder on the network, the
Network Test will notify you.
This is the test setup screen. This allows the user to configure
and select the tests desired. Each option is toggled by selecting the selection
and pressing <Enter> to change the option. The number of tests is simply
entered from the keyboard in the appropriate box.
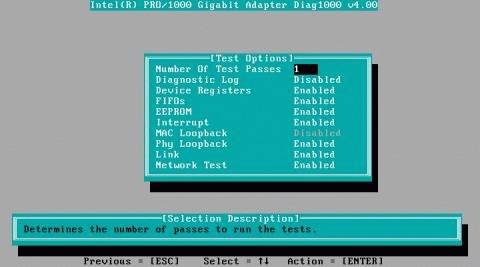
Diagnostic Log - This is normally disabled. When you enable it, it
asks for a directory for the log file. The file it places here is named DIAG.LOG.
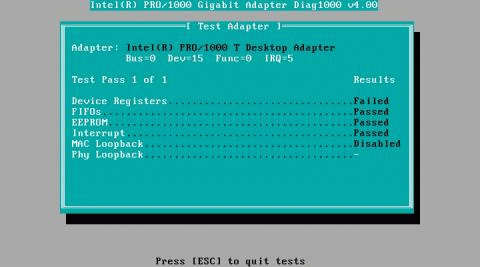
Device Registers - The adapter's
device registers are read from and written to, to ensure proper functionality.
This test goes through each register on the adapter and writes a value to it
then reads it back and verifies that the value is the expected value.
FIFOs - Diag1000 writes test bit patterns to
the adapter's FIFOs, to make sure the FIFOs are
working properly.
EEPROM - This test tests both the readability of the EEPROM as well
as the integrity of the data stored in the EEPROM. It reads the EEPROM and
calculates the checksum. This checksum is then compared to the checksum stored
in the EEPROM. If it is not the same the test reports failure.
Interrupt - The interrupt test tests the adapter's ability to
generate an interrupt and have it propagated through the system to the PIC.
The test triggers and interrupt by setting the interrupt cause register and
then verifies that an interrupt has been triggered. On EFI, interrupts are not
supported. Therefore, this test sets the interrupt cause register and reads
the interrupt set register which verifies the card internally registered an
interrupt.
MAC Loopback and Phy Loopback - There are two loop back tests
supported by Diag1000. Some adapters do not support MAC Loop back. These
adapters only allow for PHY Loop back tests. These tests set the adapter in
the appropriate loop back mode and send packets to the adapter. The test
succeeds if the adapter receives those packets.
Link - Diag1000 checks to see if the
adapter has link or does not have link.
Network Test - The Network Test looks for a responder, and then
sends 1000 packets. If no responder is found, then the test will indicate that
no responder was located. If packets are received back from the responder, the test has succeeded.
Set Up as Responder
This allows the user to setup the adapter as a responder so
another system can perform the continuous network test. Selecting this brings up
the transmit/receive screen. This will fail if the adapter does not have link.
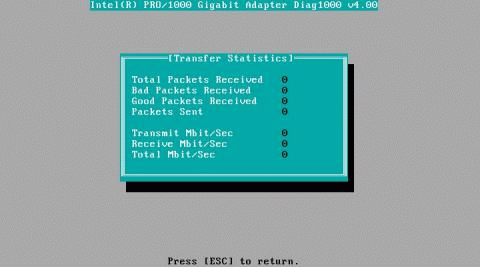
The top line identifies the adapter being tested. Information is displayed and
continuously updated during responder operation.
When you press <Esc>, the
responder operation is cancelled and control is returned to the Test Adapter
menu.
Continuous Network Test
This performs network tests to make sure that the network is
working properly. The adapter will look for a responder. If none is found, the
program will tell you this. The transmit/receive screen appears just as with
the "Setup As Responder" menu option.
When this test is running, the following
information is displayed and continuously updated:
The top line identifies the adapter being tested. The adapter provides the Function
and Address values on the first line of data.
All other values are determined by the system's PCI/PCI-X controller. The speed and
duplex mode are determined by the capability and setting of the card, hub/switch
settings and overall network conditions.
When you press <Esc>, this test
is cancelled and control is returned to the Test Adapter menu.
When the diagnostic log is enabled, test results
are recorded in a log file named diag.log. If it does not already exist,
the test utility creates it. Otherwise new data is appended to it.
Each
entry in the log file is time stamped. The test run banner identifies the tested
adapter according to it's bus slot address. An example log file entry is shown below:
-------------------------- Begin Diagnostic Testing ---------------------------
Intel Gigabit Adapter in bus/device/function: 0/19/0
20:25 Register Tests Failed
20:25 FIFO Tests Passed
20:25 EEPROM Tests Passed
20:25 Interrupt Tests Passed
20:25 Phy Loopback Tests Passed
20:25 Link Tests Passed
20:25 Network Tests Failed
-------------------------- Tests Completed - Errors ---------------------------

-------------------------- Begin Diagnostic Testing ---------------------------
Intel Gigabit Adapter in bus/device/function: 0/19/0
20:25 FIFO Tests Passed
20:25 EEPROM Tests Passed
20:25 Interrupt Tests Passed
------------------------ Tests Completed - No Errors --------------------------
Copyright © 2002 Intel Corporation. Legal Information